Toilet Renovation Cost Vancouver 2026: $400 to $8,500+ Real Pricing
Magkano ba talaga ang pag-aayos ng palikuran sa Vancouver? Ang isang like-for-like two-piece swap ay tumatakbo sa $400–$900 na naka-install; ang isang pirasong pinahaba ay $650–$1,500; isang smart bidet toilet (na may GFCI outlet at supply line work na kailangan nito) ay tumatakbo ng $1,300–$4,500; ang toilet na nakadikit sa dingding na may in-wall tank carrier ay tumatakbo ng $3,000–$8,500+. Narito ang totoong breakdown mula sa aming kamakailang Metro Vancouver na mga proyekto sa banyo.
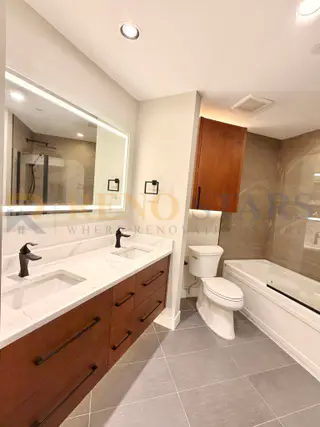
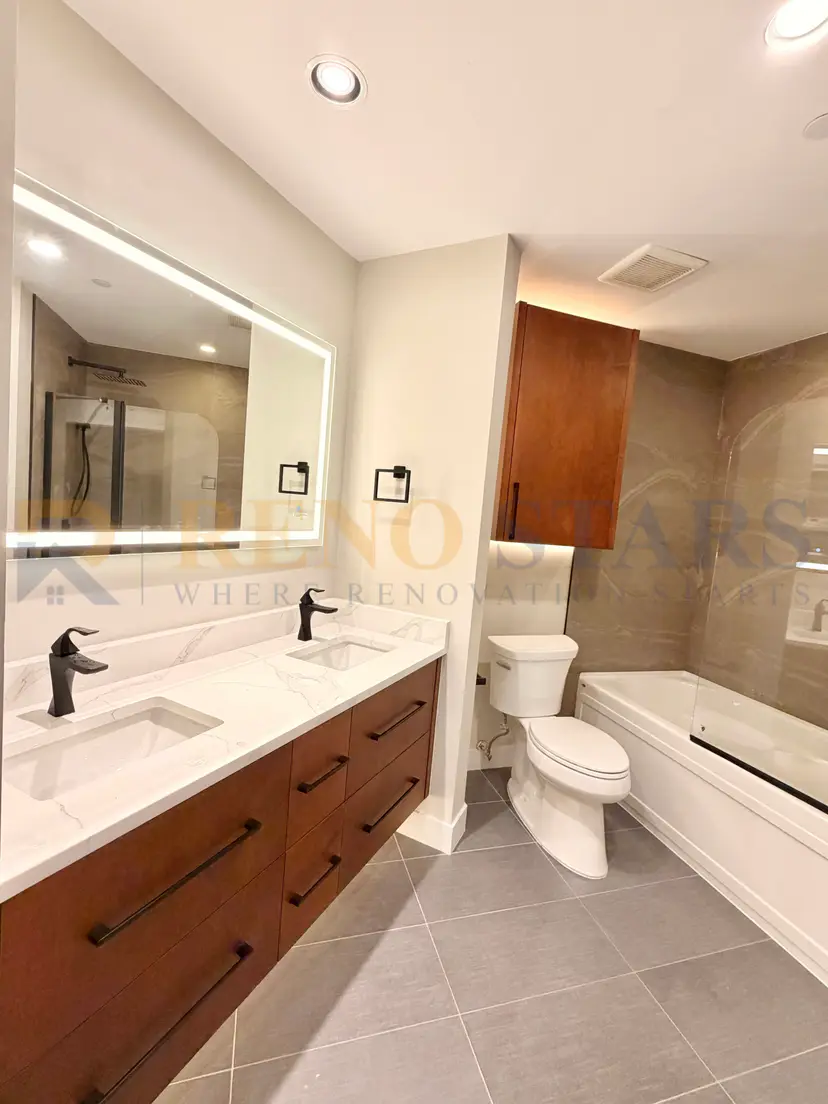
A toilet swap is the cheapest plumbing fixture decision in your bathroom — until you start adding smart features, wall-hung carriers, or bidet wiring. Then it becomes one of the most expensive. Here's what toilet renovation actually costs in Metro Vancouver in 2026, broken down by tier and based on real Reno Stars project data. Part of our bathroom renovation cost guide — see the full breakdown by piece count, design style, and the rest of the bathroom-cost cluster.
Quick price summary
| Scope | Vancouver installed cost | Lead time | Best for |
|---|---|---|---|
| Basic two-piece swap | $400 – $900 | 1–2 hrs | Rentals, secondary baths, fast refresh |
| One-piece elongated comfort-height | $650 – $1,500 | 2–3 hrs | Most family-home renovations |
| Skirted one-piece + soft-close seat | $900 – $2,000 | 2–4 hrs | Modern look, easier cleaning, master ensuites |
| Smart / bidet toilet (Toto, Kohler Numi) | $1,300 – $4,500 | 3–6 hrs | [Aging-in-place](/en/services/accessible-bathroom/), hygiene-focused, master ensuites |
| Wall-hung + in-wall tank carrier | $3,000 – $8,500+ | 1–2 days | Luxury master ensuites, small powder rooms reclaiming floor space |
Prices are installed and include the toilet itself, new wax ring or rubber gasket, supply line, shutoff valve replacement (if needed), and disposal of the old fixture. Flange repair, subfloor patches, GFCI outlet work for smart toilets, and structural work for wall-hung carriers are billed separately.
What drives the price
1. Toilet itself (50–80% of total)
The fixture price is the biggest driver. Categories we install most:
- Basic two-piece (Glacier Bay, American Standard Champion): $200–$500 fixture. Tank bolted on top of bowl, the cheapest path. Works fine for rentals and secondary bathrooms.
- One-piece elongated comfort-height: $400–$1,000 fixture. Fully integrated tank/bowl, no seam to clean, comfort-height (17"–19") matches modern preference. The default choice for most renos.
- Skirted one-piece (Toto Aquia, Kohler Veil): $700–$1,800 fixture. Smooth flat sides hide the trapway — much easier to clean, more designer look.
- Smart / bidet toilet (Toto Washlet, Kohler Numi): $800–$3,500+ fixture. Heated seat, integrated bidet wand, deodorizer, auto-flush, ambient light. Toto S550e is the household standard at ~$1,200; Kohler Numi 2.0 hits $7,000+ at the top end.
- Wall-hung bowl (Geberit, TOTO wall-hung): $400–$1,500 for the bowl alone, plus $400–$1,200 for the in-wall tank carrier. Total fixture cost runs $800–$2,700 before installation.
2. Installation labour ($200–$1,500)
Installation cost scales with complexity:
- Like-for-like two-piece swap: $200–$400 (~1–2 hrs of plumber time, no flange work)
- One-piece swap with new shutoff + supply line: $300–$500
- Smart toilet swap requiring GFCI outlet: $500–$1,000 (electrician adds $250–$500 for GFCI install, plumber does the rest)
- Wall-hung install with in-wall tank carrier: $1,000–$2,500 labour (frame the wall, set the carrier, drywall + tile around it, bowl mount last)
- Drain relocation (toilet moves more than 12"): $800–$2,500 added (cut subfloor, re-glue ABS, new closet flange, sometimes new vent)
3. Flange + subfloor work ($150–$1,200 add when needed)
The closet flange (the plastic or brass ring sealing the toilet to the drain pipe) often cracks during a swap or is already cracked from a previous install. Replacement runs $150–$300. Pre-1990 Vancouver homes routinely surface rotted subfloor under the toilet from a slow leak — patching the subfloor adds $300–$1,200 depending on rot extent. Always budget for this on any home older than 30 years.
4. Smart-toilet electrical ($250–$700 add)
Every smart/bidet toilet needs a GFCI outlet within 36" of the unit. If one doesn't exist (most Vancouver homes built before 2010 don't have one behind the toilet), an electrician runs new wire from the nearest source. Cost depends on wall access:
- Wall is open (during a renovation): $250–$400
- Surface-mount conduit (ugly but cheap): $250–$400
- Fish wire through finished wall: $400–$700
- Concrete-floor condo with no nearby outlet: $600–$1,200
5. Wall-hung carrier + structural ($600–$3,000 add)
A wall-hung toilet is gorgeous and frees ~9"–12" of floor space — but the in-wall tank requires a structural carrier (Geberit Duofix or equivalent) anchored to studs and the floor plate. Costs added beyond the carrier itself:
- 2x6 wall framing required (carrier won't fit in 2x4): $600–$1,200 if walls are open, $1,500–$3,000 if walls are finished and need to be opened
- Drywall + tile work to close the wall around the carrier: $400–$1,200 depending on tile complexity
- Engineered floor reinforcement on second-floor wood-frame: $300–$800 if joists need sistering
Where Vancouver homeowners overspend
- Buying a Kohler Numi 2.0 ($7,000+) for a secondary bathroom. The Numi is incredible but its features (motion-activated lid, ambient lighting, voice control) are wasted in a guest bath used 2× per month. Specify a Toto S550e ($1,200) for any non-primary bath; reserve the flagship for the master.
- Wall-hung toilet in a small powder room without 2x6 walls. Opening up a finished 2x4 wall to add 2x6 framing for a Geberit carrier turns a $2,500 powder room toilet into a $5,500 mini-renovation. Confirm wall depth before committing to wall-hung.
- Smart toilet with no GFCI outlet planned. The bidet seat needs power. We've seen homeowners install a $2,500 Toto Washlet only to discover there's no outlet — surface-mount conduit follows, and the install ends up looking like an afterthought. Plan the outlet during demo, not after.
Where homeowners under-spec
- Choosing a 16" standard-height bowl in a forever home. Comfort-height (17"–19") is the modern default for a reason — knees of every age appreciate it. The $50–$100 upgrade is among the most-loved on a 20-year hold.
- Skipping the soft-close seat. A $50–$100 add eliminates slamming for the life of the toilet. Always include in the spec.
- Forgetting the bidet attachment on a non-smart toilet. Even if the budget doesn't cover a Toto Washlet, a $50–$100 mechanical bidet attachment (no electrical needed) gets 80% of the function. The Tushy Classic is the go-to.
Real Vancouver toilet costs from recent projects
- Yaletown rental refresh, basic two-piece swap: $450 installed (Glacier Bay round-front 2-piece, new shutoff + supply line)
- Burnaby SFH master ensuite, Toto Aquia skirted one-piece: $1,400 installed (toilet $850, install $300, new flange $150, new shutoff $50)
- Coquitlam standard bath, Toto Washlet S550e on existing one-piece: $1,650 installed (Washlet $1,150, GFCI outlet $400 fish-through finished wall, install $100). Project: Coquitlam bathroom
- Maple Ridge bathroom, full Toto S550e smart toilet (one-piece + integrated bidet seat): $2,800 installed during a full bath reno (toilet $2,200, GFCI outlet during open-wall demo $250, install $350)
- West Vancouver luxury ensuite, wall-hung Toto + Geberit Duofix carrier: $5,400 installed (carrier $1,200, wall-hung bowl $1,800, Toto Washlet $1,200, framing + drywall + tile around carrier $1,000, plumber labour $200)
Smart vs basic: how to decide
The smart toilet question is almost always about household priorities, not budget. Quick filter:
- Basic two-piece is fine if: rental property, secondary bath used < 5×/week, or you simply don't enjoy bidet features.
- One-piece comfort-height is the default if: primary bath, family home, want the cleaner look without smart-feature complexity.
- Smart / bidet toilet pays back if: primary master ensuite, household members 50+ planning to age in place, hygiene-focused household, OR resale-positioning a luxury home (smart toilets read "premium" to most Metro Vancouver buyers).
- Wall-hung is worth it if: small powder room where the floor space matters, OR full-gut master ensuite where the modern look is non-negotiable. Otherwise the cost premium isn't proportional to the benefit.
How to budget your toilet work
- Decide tier first (basic / one-piece / smart / wall-hung). Each tier shifts the labour budget downstream.
- Confirm GFCI outlet exists if going smart. If not, get the electrician quote before committing to a smart toilet.
- Confirm 2x6 walls if going wall-hung. Standard 2x4 walls won't accept a Geberit Duofix carrier.
- Budget $300 contingency for flange + subfloor surprises. Pre-1990 Vancouver homes routinely surface rotted subfloor when the old toilet comes out.
- Order 2 weeks ahead for smart toilets. Toto Washlets ship from supplier warehouses — backorders extend lead time.
Related cost guides
- Bathroom Renovation Cost Vancouver: $10K–$60K Real Data — the parent guide for full bathroom cost
- Bathtub Renovation Cost Vancouver: $800–$8,500+ — same depth on bathtubs
- Shower Renovation Cost Vancouver 2026 — tub-to-shower conversions, curbless walk-in showers, and glass enclosure upgrades
- Vanity Renovation Cost Vancouver: $700–$7,200+ — same depth on bathroom vanities
- Bathroom Renovation Services — what we do, how we work
See our verified five-star reviews from Metro Vancouver homeowners.
About Reno Stars — Vancouver-based renovation company serving Metro Vancouver since 2019.
Want a real quote on your toilet work? Send us a photo of the existing setup and what you're considering, and we'll come back within 48 hours with three priced options across the tiers above. Get a free in-home consultation.
Metro Vancouver homeowners increasingly include a heat pump HVAC upgrade in their renovation plans — these systems provide efficient heating and cooling year-round, and qualify for BC Hydro and CleanBC rebate programs.
When renovation projects add new appliances, EV charging stations, or smart home systems, a critical load panel upgrade is often needed to safely handle the increased electrical load.
Frequently Asked Questions
How much does toilet installation or replacement cost in Vancouver?
Toilet replacement costs in Metro Vancouver range from $400 to $2,500+ depending on the toilet and any plumbing involved. A standard toilet supply + installation (same rough-in location): $400–$800. Mid-range comfort-height elongated toilet with bidet seat: $800–$1,500. Moving the toilet to a new rough-in location (requires plumbing work): add $1,500–$4,000. Wall-hung toilets with in-wall carrier and tank: $2,000–$5,000 all-in. Macerating toilets for below-grade bathrooms: $1,200–$3,000. No permit is required for a like-for-like toilet replacement at the same rough-in. A plumbing permit is required when moving the drain.
What is a comfort height toilet and should I get one in Vancouver?
A comfort-height toilet (also called ADA-height or right-height) sits 17–19 inches from floor to seat — 2–4 inches higher than a standard toilet (15 inches). Most Metro Vancouver homeowners over 40 find comfort-height significantly easier on knees and hips when sitting and standing. Comfort-height is universally recommended for aging-in-place bathrooms and is now the default choice for primary bathrooms in new Vancouver renovations. Children and people under 5'4" may find the extra height awkward. Reno Stars installs comfort-height as the default in any bathroom renovation unless the client specifically prefers standard height.
Do I need a permit to replace my toilet in Vancouver?
No permit is required for a like-for-like toilet replacement in Metro Vancouver — if you're removing the old toilet and installing a new one in the exact same rough-in location (standard is 12" rough-in from wall), no permit needed. A plumbing permit IS required if you're: moving the toilet to a different location (requires rerouting the drain), installing a toilet in a new bathroom (permit required for the entire new bathroom), or replacing a toilet in a strata unit that requires strata approval (this is a strata bylaw matter, not a building permit). See our guide to BC Strata Renovation Rules for Metro Vancouver homeowners. Reno Stars confirms permit requirements before any plumbing work.
What is the most water-efficient toilet for Vancouver in 2026?
BC's Plumbing Code requires a maximum 6L/flush for new toilet installations (standard flush). Dual-flush toilets offer 3L (half flush) and 6L (full flush). The most water-efficient toilets certified for BC in 2026: TOTO Drake II (1.28 gpf / 4.8L), Kohler Wellworth with ReadyLock (1.28 gpf), American Standard H2Option dual flush (1.0/1.6 gpf). Metro Vancouver's Tap Smart program has offered rebates for high-efficiency toilets in the past — check gvrd.ca for current 2026 rebate availability. Reno Stars specifies WaterSense-certified toilets as the default on all bathroom renovation projects.
How do I know if I need a 12-inch or 14-inch rough-in toilet in Vancouver?
Measure from the finished wall (not the baseboard) to the centre of the toilet bolts. A 12-inch rough-in is standard in most Metro Vancouver homes built after 1960. Older homes (pre-1960, particularly Vancouver Special era) sometimes have 10-inch or 14-inch rough-ins. If you measure anything other than 12 inches, you'll need a specific toilet for that rough-in — or a plumber to adjust the flange location. Getting this wrong means the new toilet either doesn't fit, gaps from the wall, or covers a different footprint. Reno Stars measures before ordering any toilet on bathroom renovation projects.
How long does a toilet replacement take in Vancouver?
A standard toilet replacement (remove and reinstall, same rough-in, no plumbing changes) takes 2–4 hours for an experienced plumber. A wall-hung toilet installation requiring a new in-wall tank carrier takes 1–2 days. A toilet replacement that also involves addressing a damaged wax ring seal or repairing the subfloor around a leaking base takes 1–2 days depending on extent. Most toilet replacement projects in Vancouver don't require a permit (like-for-like replacement, no rough-in changes). Moving the toilet rough-in to a new location requires a plumbing permit. Older Metro Vancouver homes may also need our Poly-B Pipe Replacement service to eliminate unsafe plastic piping.
Also see: Vancouver renovation cost complete guide | Basement Renovation Vancouver | How to Finance Your Vancouver Renovation (HELOC Guide) | Renovation Financing Options | Average Bathroom Renovation Cost Vancouver | Glass Shower Doors Vancouver | Bathroom Renovation Planning Guide | 3-Piece vs 4-Piece Bathroom | Tub vs Shower Vancouver | Small Bathroom Ideas Vancouver | Burnaby Bathroom Renovation | Best Bathroom Tiles Vancouver | Home Renovations in Vancouver | Kitchen Renovation Vancouver | Cabinet Refinishing | Pre-Sale Renovation Advice | Vancouver Renovation Cost Guide 2026 | BC Renovation Permits Guide | How to Choose a Contractor | Renovation Timeline Guide
See Also — Renovation Cost Guides
- Kitchen Renovation Cost Vancouver — average $15K–$80K in Metro Vancouver
- Basement Renovation Cost Vancouver — average $20K–$80K
- Cabinet Refinishing Cost Vancouver — from $4K for refinishing
Reno Stars
Professional renovation company serving Metro Vancouver with 20+ years of experience, $5M CGL insurance, WCB coverage, and up to 3-year warranty.